Sippin' on Syntactic Sugar

proudly made here on earth

CSS Polygons Explained

I’ve been recently diving into front end development and am discovering the power of CSS and image manipulation. Previously I had known about adjusting the shape of corners was done with border-radius property:

image with rounded corners
`border-radius: 50px;`

Of course this method easily produces those cool circular profile pics that you see all the time:

image with fully rounded corners
`border-radius: 100%;`

But what if you want to create an image with “cut corners”?

image with cut bottom corners

I discovered that CSS has an element called polygon. With this you can create all sorts of shapes, like stars, if you wanted. For the task at hand, you can create the cut corner with the following:

example of polygon code

All the values within the ‘polygon’ could be overwhelming so let’s walk through it. Essentially each grouping is a point. So… polygon(x1 y1, x2 y2, x3 y3, x4 y4, x5 y5, x6 y6);. The image is basically on an x-axis and y-axis where the upper left corner is (0,0) coordinate and bottom right corner is (100%, 100%) coordinate.

x-axis and y-axis diagram
Upper left corner = (0,0). Bottom right corner = (100%, 100%).

polygon image with x and y axis overlay
Math is powerful.

I’d recommend practicing adjusting the values of the points to get more comfortable. You can use CodePen and here is one that I made:

See the Pen polygon by Charlotte Chang (@glamouracademy) on CodePen.

Also Bennett Feely has a great tool for making clip-paths via CSS called Clippy.

3 Lessons Learned From My First (3) Conference Talk(s)

One of my 2015 professional goals to speak at conferences. I set out to the task, reached out to the local community, and got accepted to speak three times in one day! (Three talks in one day was somewhat accidental and I’d recommend a presentation load of less than 3 as a first time public speaking experience.) That day was this past Saturday. I somehow survived this with the lack of sleep, not missing any work and with the support of my co-workers, the community, my parents and dog trainer! (Best dog trainer in the Cleveland: Darwin Dogs)

How’d I do? Well, no one got up and left any of my presentations, I haven’t received any trolling, and people wanted to ask questions afterward, so I’ll take this as a success! There’s definitely room for improvement and I’m really glad to have had the experience of speaking in public. Here are 3 lessons learned:

1. Dry run. A lot.

The presentation that was farthest along got more run-throughs with people – 1x with a peer and at a Ruby meetup group. Practicing the presentation helped tremendously.

a. Flow.

My presentations use a lot of anecdotes and examples to help illustrate the concepts of Agile software development. Dry running allowed me to test whether those anecdotes and examples were distracting or in support the points I was trying to make. It also helped me practice the transitions between concepts.

b. Memory.

I knew the some topics of the presentation better than others. And interestingly, even with topics I knew fairly well, like referencing personal experience, I found it harder to recall during the actual presentation. Doing dry runs definitely commits the presentation to memory, making the actual presentation easier. On a sidenote, I found using speaker notes to be distracting.

c. Speaking in front of people.

It’s within my nature to people please. This holds true with public speaking. Being able to continue speaking while sensing the audience is a hard, yet valuable skill. (An audience can be a distracting thing!) Additionally, taking in that audience feedback (e.g. facial expression, body position) allowed me to adjust my delivery – speed up, slow down, go into more detail, add more/less humor – as needed. Practice definitely helps and gauge expected, and unexpected, responses.

2. Know the presentation room AV tech.

I brought three different types of dongles with me, which proved valuable (as I needed them). One of the conference talks was at a university, where the room had a built in AV system. I was caught off-guard with getting my computer set up with an unfamiliar AV system, especially one where plugging my laptop resulted in my screen being displayed on a huge lecture hall screen. Next time, I’ll definitely ask the conference organizer if I can test prior to the day starting.

3. Save some energy for post-talk questions.

After listening to conference talks, I am usually energized and inspired. I was surprised how tired I was after speaking. People wanted to chat after the talks, which is a good thing. But especially being an introvert, I found having to respond thoughtfully to statements like “I’m not sure what to do with my life”, pretty challenging. I’ve now realize that some questions deserve more time and I can pass along my contact info where hopefully there can be a more meaningful exchange.

Even though three talks in one days was a bit much, I’m glad that I had the experience. I’m thankful for the opportunity to do so with We Can Code It and Case Western Reserve University’s Link-State Conference. I definitely have a better sense of how to prepare and I’m looking forward to my next talk , which as of now is for CodeMash 2016, where I’ll be presenting “Software Development Lessons from Industrial Failures of the 1980s.”

How to Bulk Delete Files in Git in 5 Steps

You might be familiar with rm -rf and if you are, you probably also were warned to be very careful. So I’m pretty cautious about deletions for fear of accidentally deleting directories. Generally I’m not deleting a lot of files, so a simple git rm /path/to/file will suit just fine. However if you find yourself in a situation where you’re trying to bulk delete files, deleting each file is quite tedious.

You also might have noticed that when you do a git add . only the staged, modified files get added and you get the following message: “(use “git add/rm <file>…” to update what will be committed)”

So here’s how you bulk delete files:

  1. See what is actually staged via git status (btw this is generally a good practice). I’m assuming that your deleted files are “not staged for commit”.

  2. Stage your deleted files – git add -u

  3. Confirm that your deleted files are staged – git status

  4. Commit your now staged deleted files – git commit -m "your_message"

  5. Push your commit like normal – git push

For more info, this stackoverflow is also helpful! And many thanks to @joelbyler for patiently walking me through it!

Hope everyone is staying warm this winter!

Some Helpful Hints on How to Squash Commits in a Github Pull Request

Let’s say you want to submit a pull request but you’ve committed more than once and let’s say that also you’re not satisfied with the commit message you originally used. Let’s say you might be feeling like this:

There’s a great post by Steve Klabnik: How to Squash Commits in a github pull request

There were a couple of things that I needed to know in order to follow Klabnik’s helpful post.

First, find out what remotes are set up: git remote -v.

```
origin git@github.com:youraccount/repo.git (fetch)
origin git@github.com:youraccount/repo.git (push)

```

In this case I didn’t have upstream set up.

So, add upstream: git remote add upstream git@github:projectrepourl.git (You can get this url by navigating to the project’s repo and copying the clone URL.) Confirm that you’ve added the remote: git remote -v.

```
origin git@github.com:youraccount/repo.git (fetch)
origin git@github.com:youraccount/repo.git (push)
upstream git@github:projectrepourl.git (fetch)
upstream git@github:projectrepourl.git (push)

```

Note: if you’re not super experienced with git, you might be wondering about ‘origin’, ‘master’, ‘upstream’. Here’s a just little image that hopefully will help:

Now you can follow Klabnik’s post:

```
$ git fetch upstream
$ git checkout master
$ git rebase -i upstream/master

```

At this stage, you’ll get the opportunity to view the commits you had made previously.

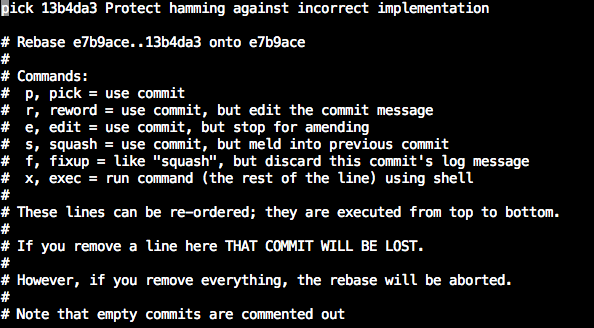
Note: this image is after I had squashed so you only see one commit; but, you can get an idea of what you’d see in vim

Add an s or squash to the commits that you want to squash. For me, I added an s to the commit after the first commit. The word pick prepends the commit info. So delete the word pick from the second commit and add s in it’s place. You now get the option to edit the commit message.

Finally, as Klabnik says: $ git pull origin master -f If you go back to github, you’ll see that your commits have changed to the squashed number of commits. (For me I squashed two commits to one.)

Subtracting Arrays on a Thursday

Just a little Thursday afternoon note about subtracting arrays that was discovered doing the hamming test, which detects the number of differences between two different DNA strands.

Let’s say you had to two DNA strands:

1
2
strand1 = [G,G,A,C,G]
strand2 = [G,G,T,C,G]

If you subtracted strand1 from strand2, you’d expect the difference to be 1, right? In fact, it is 1.

Let’s take another example of another two DNA strands:

1
2
strand3 = [A,G,A]
strand4 = [A,G,G]

If you subtracted strand3 from strand4, you’d expect the difference to be 1, right? There is 1 letter different between the two strands.

However what you get is 0.

It seems that the - operator checks for uniques rather than checking in place.

Happy Thursday!

The Ruby Date Class: A Brief Lesson Learned

Why can I use the Ruby `Date` class without requiring date?

I was doing an exercism.io exercise, Gigasecond, which required me to address my fear of date and time. (You can see my submission here and nitpick if you’d like.)

I noticed that I could use date without actually requiring date.

I thought to myself, “hmmm, that seems awfully inefficient. Why should I type require 'date’ if I don’t need to?” So this caused an investigation into: Do I actually need to require ‘date’?

My first stop was irb, where I noticed that I would get different results depending on whether or not required date and further if I required date after the fact, the result would change too.

1
2
3
4
5
6
7
8
9
10
11
12
13
14
15
16
date = Date.new
=> #<Date: -4712-01-01 ((0j,0s,0n),+0s,2299161j)>

date.class
=> Date


require ‘Date’
new_date = Date.new
=> #<Date: -4712-01-01 ((0j,0s,0n),+0s,2299161j)>

new_date.class
=> Date

date.class
=> uninitialized constant error/bug!

Suspicious.

I did the same exercise in repl.it and got an uninitialized constant error. I also did the same investigation for Time but there was no inconsistency in the results. So this led me to believe there was some versioning issue or perhaps there really is an bug in irb.

I posted on StackOverflow and got some good information.

Basically, it’s a Rubygems bug for Rubygems versions earlier than 2.4.0!

So, if you run gem environment in terminal you should see what version of ruby gems and ruby you’re running.

Apparently there is an intention to include this Rubygems fix into Ruby 2.2. So until then, you can update your version of Rubygems by:

1
2
$ gem install rubygems-update
$ update_rubygems

and voila! When you try to create a Date object without requiring date you should now get a uninitialized constant error.

Happy halloween.

Refactoring: My 5 Steps to 90% Less Code

I recently had a lot of fun coding the hamming distance via exercism.io. Firstly, I want to caveat that I totally recognize that my approach to this problem is done in a bubble. That is, I don’t have business constraints, tech constraints, just newbie brain constraints. ;p

I got exercism.io up and running and after reading the README.md, ran the first test.* The exercism.io exercises have tests written that need to pass, which is how you end up writing the program – yeah TDD!

Before I started coding I decided that my overall approach was going to be Kent Beck’s Make it Work, Make it Right, Make it Fast. This meant I wasn’t going to worry about the next test or the previous test. I just wanted to do the easiest thing working.

Step 1: Get it working!

The tests are 42 lines of code. My first solution was 61 lines of code. And all the tests passed. It was ugly but it worked, like using a fork to comb your hair* – it sort of hurts but it gets the job done.

images

There were three areas of refactoring that I could think of:

  • readability
  • duplication
  • nested conditionals


Step 2: Refactor for readability

The first thing that jumped out at me was how I was converting a string into an array. Basically I had an empty array for each string, splitting on each letter of the string and then each of those letters ended up into their respective array. Although it was explicit, it was also a bit taxing to read how it was being split, e.g. .split(//). .split(//) is powerful as it allows strings to be split in a number of ways but I just needed a basic splitting by each character.)

images


Then, I learned about the .chars method.

OMG .chars! (Yes it’s similar to my name but that’s not why I’m excited.) .chars returns an array of characters for a string (Ruby docs). Basically str.each_char.to_a. Or in my mind, delicious magic.

images

Down to 43 lines of code.


Step 3: Refactor explicit duplication

The easiest thing I noticed next was that I declared the same variable 4 times. That’s at least 3 times too many.

images

Since all my conditionals are in the same method they can all access the variable. So since Ruby reads code from top to bottom and since , I’ll extract it to the top of my method, outside of all the conditionals. (There’s also a pattern to extract variables in The Refactoring Catalog.)

Note: it’s at this stage that I realised there’s a bug within my code (lines 26 & 33). I’m submitting a pull request to add tests to exercism.io and for the purposes of this blog it should be fine.

Alright, 38 lines!


Step 4: Refactor simple functional duplication

The two conditionals on lines 21 and 27 look very similar. They both:

  • check if one strand is longer than the other (lines 21, 27)
  • trim off the extra letters of the longer strand so that it’s the same length as the shorter strand (lines 22, 28)
  • creates an array for the new strand (lines 23, 29)
  • creates a combined array of arrays that contains the paired elements from the two arrays (lines 24, 30)
  • compares to see if the paired elements match and counts if they do not match (lines 25, 31)

images

So really, if one strand is longer than the other, regardless if it’s the first strand passed or second, what we’re really saying is that the two strands don’t equal.

I can use .min to determine the minimum length of the two strands and then I can trim both strands to that minimum length while zipping them into one array that contains arrays of paired elements from the two strands.

Lastly, I can iterate through those paired elements and check if they are the same value. I can then count the number of times they do not match, which is the Hamming Distance.

images

31 lines!

Step 5: Refactor functional duplication

images

I wrote the conditional on line 5 more explicitly. But I noticed that it’s doing the same function as the conditional on line 21. (There’s the beauty of Ruby – many ways to do something!) However, at RailsConf this year I went to Sandi Metz’s talk “All the Little Things”. She mentions that nested conditionals are good candidates for refactoring. And let’s be honest, while I do love that it’s very much step-by-step, it is a bit long and there’s mental overhead to remember where I am in the condition.

(As a sidenote, this refactoring made me realize the potential tradeoff (especially as a newbie) between clarity and readability, specifically:

  • laying out all the steps seems clear however it take mental effort to remember all the steps and where I am in those steps
  • collapsing code makes the code more dense and that also takes effort to read.)

It’s at this point that I suspect (ever so cautiously) that the conditional on line 21 might pass all my tests. (For the record, this is like waiting in line for a roller coaster or trying out a new recipe and waiting for it to bake in the oven – you are really excited and hopeful but also a bit scared that it might just go all wrong. And my imposter syndrome rears it’s head too.)

So I move the magic conditional to the top of my method, remove it’s conditional-ness, and comment out all the rest of the code. (#fearofcodecommitment)

images

…and run my tests.


…and listen to:

It worked! I’m a wizard! Actually I’m a paladin! Someone high five me or fist bump me!

images


7 lines of code!

5 steps. 90% less code.

You can nitpick me here. (On line 4, I do think there’s one debatable improvement for readability and one less debatable improvement for removing duplication.)

*Thanks to exercism.io for inadvertently teaching me about skip in MiniTest.

*Yes I’m referencing Ariel in The Little Mermaid.

Keep Calm and Code On

Learning can be hard. There I said it. So, here are a few tips to help deal with learning to code:

  1. 30 min limit: if you are running into a problem for more than 30 min. put it down. don’t continue to bang your head against the wall. It’s frustrating. (FWIW There are lots of real studies about the benefits of taking breaks and there are even more apps that try to help you incorporate breaks like Time Out.)
    • More time spent doesn’t necessarily mean getting closer to the solution - you’re a newb you’re still establishing context and code prowress thus there’s a greater possibility that you can go off track and also get more and more frustrated (which doesn’t help)
    • Have a few things that you want to work on. put the one you’re having problems with down and work on something else. it helps to have a set of things you’d like to do that vary in terms of size, difficulty, and interest. A mental break that I learned from The Flatiron School, and continue to do, is taking the time to learn about a programmer (e.g. Programmer of the Day).
    • Do approach the problem later with a fresh start - either by just giving yourself time to digest, reaching out to others, or researching online.

  2. Break it down. A classic exercise that you might learn when beginning to think like a coder is explaining to an alien how to make a peanut butter sandwich. When you first approach this you’re thinking ’no problem! I’ve done this like in real life even!’ You know every step. But when you start writing the steps, you start to realize how many tasks comprise a step. For instance, ‘spreading peanut butter on a slice of bread’ seems like a reasonable step right? But do we need to explain where to get the peanut butter? Is it in the cupboard or fridge? Do we need to explain how to open a jar of peanut butter? Does the alien have fingers, hands and wrists like us so that it can actually twist the lid off the jar? Do we need to explain how to get peanut butter on the knife? So you are the alien. And making a peanut butter sandwich is coding. It’s foreign to you. And you can’t take for granted the little things. And it’s easy to get overwhelmed. So break things down into smaller achievable steps. You’ll feel like you’re making progress (which you are) and you won’t have to deal with the overhead of thinking about too much stuff - which can be frustrating at best and debilitating at worst. If you are an avid advocate strategist like myself, you can take the main goal and break it down into smaller (still too big to work on) steps before taking one of the steps and breaking it down into tasks. (This always helps me by confirming the context and also making sure I’m not losing sight of the larger goal, which I assume is the thing that provides value.)

  3. Be good to yourself. I can’t stress this enough. This is hard. And you’re learning. Be patient.
    • Celebrate your successes. We tend to get caught up in success being determined in a black or white, binary type of situation. Did it get done? But this is not a helpful way to think when learning something. I find better ways to measure success by answering: are you solidifying your understanding of something? are you learning something new? did you make progress toward a larger goal? I’d even go as far as to reward yourself for little things. You might have run a marathon or trained for a marathon or know someone that has. Almost all people (seriously like 99%) train for a marathon. Their goal is a marathon. But they don’t just wake up and run 26.2 mi. They start prepping months before and it’s multiple runs a week and NONE of them in fact are ever 26.2 mi! They are training. You are training. And one day, you are able to run a marathon.
    • Be good to one another. A criticism that I have for bootcamps is the natural tendency for students to compete against one another. And since folks are new, learning lots of stuff fast, and thus, feeling insecure, there’s all sorts of psychological ways this plays out. One reason I <3 Ruby is because of the saying “Matz is nice so we are nice.” Be good to one another. Maybe you know the answer that someone doesn’t know the answer to, but be cognizant that s/he might have been banging their head on the wall way longer than s/he should have been. Flippantly giving an answer is helpful but the other person may already feel dumb. Sometimes it’s not just about the right answer or code golf.

Learning is hard. You’re doing something new. You’re brave for even trying. So listen you might be having a bad day, maybe go do some online tutorials, but whatever you do – you can do it and get on with your bad self. After all, you might be instead just sitting in front of the tele eating a bag of chips.

Teaching Tech: 5 Tips From a Newb’s Point of View

I’m sitting in a large chain bookstore in a suburb of Cleveland in front of the Sci Fi/Fantasy section, which somehow gives me the cred to blog about how to get more diversity in tech.

For years “people” have been talking about increasing diversity in tech and there has been a lot of organizations and support – i.e. women who code, black techies, girl develop it, etc. This blog post isn’t about them.

This blog post is about the self-proclaimed change agents working within tech…basically those embedded within the status quo who advocate diversity. Firstly, I want to say that this isn’t to discourage or criticize your efforts. Rather this is feedback – because I think regardless of your reasoning, the efforts are beneficial. Secondly, I’m not an outraged feminist, I want more balance in the world that I live in and I’m naive enough to believe that I don’t need to rant with upcase and bangs to be heard. I hope my reasoning is loud and clear enough.

So I’ve met a handful of techie folks who are interested in pairing/teaching/mentoring people like me – “newbies”, “diverse”, etc. (For the record, I don’t have a rolodex of potential mentors, so the ones that have been willing – thank you!) Sometimes it’s hard to take you up on your offer and I want to tell you why. (Yes, I might also have imposter syndrome.)

When I have paired with these folks I find similar patterns of not being open to other ways of thinking. When I’ve given feedback so that we (as in you and me) can collaborate more effectively, I find that many are unaccustomed to having to think in a non-tech jargon way, or think in metaphors. Some seem uncomfortable with teaching strategies (that I find so helpful) such as high level to low level, working outside in or inside out, and visual diagrams. Further, some seem defensive when feedback is given. (A friend told me a story of a time when she was struggling to explain a bug that was happening in safari that wasn’t in chrome , her pair told her to “go back, and figure out how to describe this to me as if you are the lead”. So she tried. At which he replied, “no! wrong! you’re not getting it.”) Basically when these sorts of things happen I question whether us pairing together is ultimately more about me learning or so you can feel that you are doing right in the world.

Okay well I think it’s time for me to declare the obvious – I grew up an only child and I was pretty independent. I also have lived a fairly privileged life (reread the first line of this post). But I say this not to justify my potentially indignant, ungrateful attitude but because I want you to know that I’m independently minded and tough on myself too. I rode dirt bikes as a kid, I learned “computing” playing Where in the World is Carmen Sandiego on my public library’s Apple IIe, my parents immigrated…my parents says that I’m living their dream because I’ve traveled to 25 countries for pleasure, work, sport and political research. But for what it’s worth, I think what my parents did – immigrating to a country in their early 20s not knowing the language, in fact not knowing a related language, is far braver than anything I have ever done. (That’s my bar.)

So when we talk about encouragement and support, what should we be talking about? What are our tools? There are a lot of organizations and efforts to increase numbers. But here’s what I argue, the next generation of coders doesn’t have to live the same life as the current generation of coders. And further, learning to code doesn’t have to be so painful. It doesn’t have to be this idea of “I’m wrong all the time!” (which is what I thought all the time in bootcamp). Here are some techniques that I think are instrumental toward building trust, confidence and collaboration (as individuals and as collaborators):

  1. TDD: Regardless of your opinion of DHH’s opening talk at RailsConf (2014) this year, I’m proclaiming my love of TDD. TDD transforms negative feedback of being “wrong” into “incremental building”. It’s like a Choose Your Own Adventure with repetition (which also aids in learning).

  2. “Yes and”: This was the topic of my first blog post ever and I fully endorse “Yes and” as a sure way not only to collaborate but also to use those creative brain cells to connect things you may never have dreamed. “Yes and” is an improv technique that comedians, like Stephen Cobert and Tina Fey in fact (name drop!), use to build on a skit and make the skit a believable reality for the audience. In a non-improv environment, “Yes and” in itself builds on what is being said. The person who has risked failure bringing up an idea feels good and you are learning how to appreciate how others are thinking by actively having to adapt (and potentially adopt) their ideas. (For the record, as I’m learning to code, aren’t I basically always improvising?) Anyway, at minimum, yes, try to not to say ‘no’.

  3. Echoing back and ask questions: I’m sure we all know how often miscommunication attributes to lack of understanding. Here’s the thing: I’m a newbie. I don’t know all the jargon. (Boy, can I ever grok non-jargon tho.) It’s pretty hard to learn, recall, and act on what feels like a million things at once, like: code libraries, editor shortcuts, stack implication, domain logic, AND being able to communicate! Being open to me echoing back what I think you are saying – this will let you know what I think you’re saying. And try to echo back what you think I’m saying because that tells me what I’m saying means to you, which gives me information and increases the likelihood that I will start to understand your way of thinking, consequently, increasing the chances of picking up jargon.

  4. Use Rules of Thumb: Let’s be honest, it’s easier (and fun) to remember things like: DRY, POODR, MVC, Rule of Three, Single Source of Truth, Arrange Act Assert (AAA). My brain is trying really hard to learn and recall (see #3) and I’d like to be more efficient. Let’s take a simple example. I’ve lived and traveled to countries where driving is on the opposite side to the US. I used to try to remember where I am, what the driving standard is for that place and then look that direction of oncoming traffic. Okay that’s a lot of thinking. Seriously, looking both ways works in every country. That’s it. Look both ways.

  5. Zone of Proximal Development: I learned this from a talented dev at Pivotal Labs…this teaching strategy is: I do you watch, I do you help, You do I help, You do I watch. I think this could be the base for moving on to ping pong pairing – where one person writes the test and the other person makes the test pass. It’s also potentially less awkward because when someone is driving, sometimes I feel like I’m interrupting and vice versa sometimes I feel interrupted. I find ZPD fosters a greater chance of success for a newbie and allows for questions and learning to be comfortable. All of which build confidence!

The main idea here is that I am a person that is new to code, not new to life. How would you feel if all of my examples were technical scuba diving terms? Or the names of the side streets of Melbourne Australia (which coincidentally have amazing art, bars, and cafes)? Or touching your toes as a way to be flexible? Or if I tried to teach you how to write the chinese characters for fire, prisoner and big without teaching you the character for person first? Sure you’d try to learn it because those things are cool right? But you might be overwhelmed, even frustrated eventually. I bet if I took the time to work with you to build a foundation of knowledge that fostered understanding that is in your terms and helped figure out a way to connect those seemingly disparate tidbits of knowledge, you’d learn a lot faster and be able to recall those tidbits the next time an appropriate scenario occurred.

Google is my friend but I’d like you to be too.